

Augmented Reality has crossed a long way from Sci-fi Stories to Scientific reality. With this speed of technical advancement, it’s probably not very far when we can also manipulate digital data in this real physical world as Tony Stark did in his lab. When we superimpose information like sound, text, image to our real-world and also can interact with it through a special medium, that is Augmented Reality.
The world-famous “Pokemon GO” app is just another example of an Augmented Reality Application. Let’s make a very simple Augmented Reality App in Android Studio using JAVA. This app shows a custom made or downloaded 3d model using the phone camera. A sample GIF is given below to get an idea about what we are going to do in this article.
Step by Step Implementation
Step 1: Create a New Project
- Select Java as the programming language.
- Note the location where the app is getting saved because we need that path later.
- Choose ‘Minimum SDK‘ as ‘API 24: Android 7.0(Nougat)‘
Step 2: Getting the 3D Model
Sceneform 1.16.0 supports only glTF files. glTF means GL Transmission Format. Now .glb files are a binary version of the GL Transmission Format. These types of 3d model files are used in VR, AR because it supports motion and animation.
- For the 3d model, you have to get a .glb file.
- There are two ways, you can grab a 3d model, download from the web, or make one yourself.
- If you want to download it from the web, go to this awesome 3d models repository by Google, poly, and search for any glb file. Download any one of them for your project.
- OR, get a 3D computer graphics software and make a 3d model yourself.
- I used Blender which is completely free to download and made a 3d model of GEEKS FOR GEEKS text. Get this file from here.
- Export the model as a .glb file to a specific folder and the filename must contain small_letters or numbers.
- Come back to Android Studio.
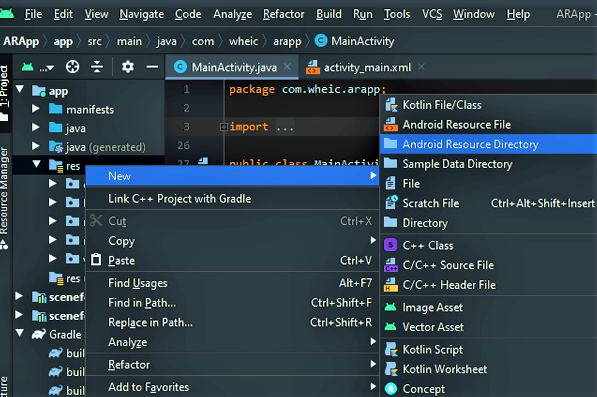
- On the left panel, Right-Click on res directory. Go to the New > Android Resource Directory. A window will pop up.
Step 3: Downloading and Setting up SceneForm 1.16.0
Well, for AR apps we need Sceneform SDK. SceneForm 1.15.0 is very famous but recently, there are some plugin errors I faced while getting the “Google Sceneform Tools (Beta)” plugin in the latest Android Studio 4.1. So here I am, using the Sceneform 1.16.0 SDK and setting it up manually.
- Go to this GitHub link.
- Download the “sceneform-android-sdk-1.16.0.zip” file.
- Extract the ‘sceneformsrc‘ and ‘sceneformux‘ folders, where you created your project. (“E:\android\ARApp” for me)
- Go the Android Studio
- Go to Gradle Scripts > settings.gradle(Project Settings)
- Add these lines:
// this will add sceneformsrc folder into your project
include ‘:sceneform’
project(‘:sceneform’).projectDir = new File(‘sceneformsrc/sceneform’)
// this will add sceneformux folder into your project
include ‘:sceneformux’
project(‘:sceneformux’).projectDir = new File(‘sceneformux/ux’)
- After that go to Gradle Scripts > build.gradle(Module:app)
- Add this line inside the dependencies block.
- api project(“:sceneformux”)
Then in the same file inside the “android” block and just after “buildTypes” block add these lines (if it’s not already there):- Then go to the app > manifests > AndroidManifest.xml
- Add these lines before the “application” block:
<!--This permits the user to access Camera--><uses-permissionandroid:name="android.permission.CAMERA"/><!--This helps to check a specific feature in the phone's hardware,here it is OpenGlES version. Sceneform needs OpenGLES Version 3.0 or later--><uses-featureandroid:glEsVersion="0x00030000"android:required="true"/><!--Indicates that this app requires Google Play Services for AR.Limits app visibility in the Google Play Store to ARCore supported devices--><uses-featureandroid:name="android.hardware.camera.ar"android:required="true"/>Step 5: Working with the activity_main.xml file
- Go to the res > layout > activity_main.xml file.
- Here is the code of that XML file:

ArFragment contains a lot of features itself like it asks you to
download ARCore if it’s already not installed in your phone or like it
asks for the camera permission if it’s not already granted. So ArFragment is the best thing to use here.
Step 6: Working with MainActivity.java file
- Go to java > com.wheic.arapp(your’s may differ) > MainActivity.java
- In the MainActivity class, first, we have to make an object of ArFragment.


0 Comments
Please do not enter any spam link in the comments box.